My photo
I have two children. My daughter Jennifer is 27 and my son Christopher is 25. And two step-sons, Trevor and Adam ages 24 and 26 along with their beautiful wives Emily and Julie and their babies, Noah and Madisyn. I also have I've been married for 12 years to my husband Gary. I'm a full time Junior High Language Arts teacher and stamping is one of my passions. All products I use are from Stampin' Up! Be sure to visit my Stampin' Up! website to view my calendar of events by clicking on the link to the right!

Sunday, April 29, 2012

Paper Bag Albums

I promised I would share this last week and never did get around to doing it.  It was probably best, because the entire project was not yet complete.

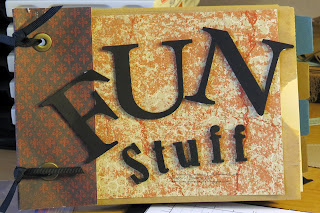
A co-worker at school is retiring at the end of this school year.  We usually present the retiree with some sort of scrapbook or memorabilia that marks his or her time teaching.  This gentleman has been a teacher for 20 years and has decided it is time to move on.  A friend of mine and I were tasked with coming up with an idea for a retirement gift for him.  We figured a typical scrapbook wouldn't do, so I came up with the idea to make up these paper bag albums.  We made a set of three albums, each with a different title; Retirement, Basketball, and Fun Stuff.  The Retirement album contains well wishes from each of his colleagues written on 4 1/2 by 5 1/2 inch Very Vanilla Card Stock.  The Basketball album contains pictures of different basketball teams he coached over the years at our school, and the Fun Stuff album contains just that; photos of him doing various fun stuff during his time as a teacher both with other staff members and students.  Each bag album will be presented to him in a decorated Ukulele case at the district's Retirement Tea on May 1.  We chose a Ukulele case because it is similar to a guitar case.  (He plays guitar and has taught several guitar enrichment classes to our students over the past few years.) The designer series paper that I used to decorate each bag is the soon to be retiring Well Worn paper from Stampin' Up!  (Item number 122359 for $10.95)  I selected this paper because it has a vintage look and the colors are very masculine.

Most of the embellishments were purchased at a local craft store.

Following the photos, I will provide you with directions on how to make one of these paper bag albums.  I hope you like what my friend and I have created.  Until next time...

Happy Stamping!

Josie


 I tried antiquing the Ukulele case by rubbing some sand paper over the surface to rough it up a little.  The musical notes are printed on to vellum card stock using clip art on my computer.  They were hand torn around the edges and glued to Soft Suede card stock.  The words around the sides of the case are the lyrics to the Beatles' song While My Guitar Gently Weeps.  The same song has also been recorded onto one of those recordable cards and the song plays when the case is open.


Here's what you need to make one paper bag album.

  • 6 - 8 brown paper lunch bags
  • snail adhesive #104332--$6.95
  • 1/4 " grosgrain ribbon
  • designer series paper
  • Very Vanilla Card Stock (Cut 6 - 8 pieces depending on number of bags you use 6 3/4" by 5".)
  • #119864 Round Tab Punch (Soon to Retire)  $16.95
Cut the bottom off of the lunch bags.  Do this by placing the long edge of the bag across the top of your paper cutter with the open end of the bag at the 7 1/4" mark.  Adhere the cut bags together with snail adhesive along the cut edge, making sure the bags are all facing the same way. 

Cut a piece of designer series paper 4 1/4" by 5 1/2".  Score it at 2" from either end.  This is used as the binding to cover the cut ends of the paper bags once they are all stuck together.  You can add a border trim to either side of the album under the designer series paper.  Using a crop-a-dile, punch two evenly spaced holes for eyelets.  Add the eyelets.  Thread a 4" piece of grosgrain ribbon through the eyelets and tie a knot. 

Punch 6 to 8 tabs using the round tab punch.  Adhere them to the edge of the Very Vanilla card stock that you have already cut into 6 3/4' by 5" pieces. Make sure to stagger them on the different pieces of card stock.  Slide one of each of these pieces of card stock into each bag.  You can add photos to these if you like. 

On each bag "page" I added a piece of designer series paper cut the same size as the Very Vanilla card stock to cover the paper bag.  You can also add pictures and embellishments to these pages. 

There you have it.  Your Paper Bag Album is complete!  :)

Sunday, April 22, 2012

Retiring Stamp Sets

Hello All,

I am providing the link to the list of retiring stamp sets that was recently published by Stampin' Up!  The last day of May is the final chance to order any of those that are going that are on your wish list. 

http://204.228.150.61/docs/lastchance/en-US/RetiredStamps_0412_en-US.pdf


Just click on the button on the right to go to my online store.  \

I will have something to show you later today and I think you are gonna like it!

Until then...

Josie

Saturday, April 7, 2012

Blank Card

Happy Easter!

It has been a week since I've been back in school after going off spring break and since my last post.  We have only 7 more weeks of school, but...who's counting?  I am! :)  The kids already think they are on summer vacation so it was a hard time keeping them focused this week.  Thinks are only going to get worse.  :(


I wasn't sure what title I should give this post, so I've called it Blank Cards since there is no sentiment on the front.  I've cased this from the Occasions Mini Catalog page 15.  I really like the way it turned out.  Maybe I will use it for this coming Mother's Day.  Now that's a thought.  The colors of card stock that I used are old olive, very vanilla, baja breeze, blushing bride, and sot suede.  The ink is early espresso for the image and soft suede was used for sponging.  The stamp set is one of my favorites from the Occasions Mini; Rue Des Fleurs.  Oh, and the background oval was cut out using a window sheet and the ovals die in the IBC.  I also used the stripes and designer frames embossing folders, also found in the IBC.  The flowers and leaves were punched using the Bird Builder and Itty Bitty Shapes punch pack.  And pearls....lots of pearls!  I think this card is so pretty and vintage-y looking.  I hope you like it.


This is a short post again today.  I still need to do a few things to get ready for Easter dinner tomorrow.  Hope everyone has a very Happy Easter!


Until next time...


Happy Stamping!


Josie

 P. S. I forgot to mention, the banner is from Take it to Heart stamp set, also in the Occasions Mini.  I simply shortened it by cutting it in half and overlapping the two cut ends and using snail adhesive to hold it together.


Sunday, April 1, 2012

One More Post

Just one more post before I head off back to work tomorrow to finish up the school year.  Spring break has been fabulous and productive.  The weather was awesome; unseasonably warm.  Today the temperature hovered around 80 degrees.  It is hard to believe the high tomorrow is only going to be in the upper 40's.  That means I have to go back to wearing winter cloths.  Blah!!

I made this card for a special person who is going through a tough time right now.  She is getting divorced and that is never a fun thing, no matter how long or short you have been married.  This person is very special to me...it is my daughter.  :(  Her husband of 2 1/2 years informed her shortly after Christmas that he no longer wanted to continue with their marriage.  This came as a shock and disappointment to all of us as I thought the world of my son-in-law.  What can I say?  He is not the person I initially thought he was.  Anyway, she doesn't know it is for her, but she will when she gets home this evening.  She is a strong woman (just like her mom :) and she will thrive when all is said and done.  As a matter of fact, she already is!

I used the Send Me Soaring stamp set along with some Sweet Shoppe designer series paper.  Both can be found in the current Occasions Mini Catalog.  I love the bright colors which are pool party, lucky limeade, and calypso coral. I hope you enjoy looking at it as much as I enjoyed making it.

Until next time...

Happy Stamping!

Josie