My photo
I have two children. My daughter Jennifer is 27 and my son Christopher is 25. And two step-sons, Trevor and Adam ages 24 and 26 along with their beautiful wives Emily and Julie and their babies, Noah and Madisyn. I also have I've been married for 12 years to my husband Gary. I'm a full time Junior High Language Arts teacher and stamping is one of my passions. All products I use are from Stampin' Up! Be sure to visit my Stampin' Up! website to view my calendar of events by clicking on the link to the right!

Saturday, December 15, 2012

Clearance Rack Blitz


Dates: December 14, 2012 - while supplies last

Details

Over 300 new Clearance Rack items are being added to the Online Store at discounts up to 80 percent off retail-only while supplies last! And for the first time ever, stamps are included at up to 40% off.

The Fine Print

  • Only online orders qualify for this promotion. Feel free to order both Clearance Rack and non-Clearance Rack items on the same order-we're flexible like that.
  • There is no minimum purchase required to participate in this special offer-go nuts!
  • Clearance Rack Blitz items are only available while supplies last-so don't wait! And sorry, but there are no refunds or exchanges on Clearance Rack items.
  • Check out all of the Clearance Rack Blitz items in the my online store..


Saturday, November 17, 2012

Sunday, October 21, 2012

Christmas Pumpkin

Isn't this guy a cutie?  Just had to share him with everyone.  I decorated him for a pumpkin decorating contest among the teachers at my school.  Hope you like him.
 
Josie


Halloween Treets

 What's up with this? Two posts in two days!  Is the sky falling?  You would think so because I haven't done something like this in a long time.  I think it's just that I want to share all of the fun things I've been up to lately. 

I cased part of these cute little twizzler holders from my friend, Cathy.  Thanks, Cathy!   I know you won't mind.  :)  After all, case means copy and share everything!  Cathy made a Halloween card with these little badges on the front, so I thought I'd copy them and put them onto little treat boxes that you can give to your friends, your little one's friends, kids a school,...everyone!

Here's what I used for this project:

  • Toxic Treats Stamp Set #127898(w)/$28.95 or #127901(c)/$20.95
  • Howlstooth & Scaringbone DSP #126906/$10.95
  • Basic Gray c/s #121044/$6.95
  • Basic Black c/s #121045/$6.95
  • Tangerine Tango c/s #111349/$6.95
  • Black Embossing Powder #109133/$4.75
  • Basic Black Craft Ink #102192/$7.50
  • Curly Label Punch #119851/$16.95
  • 2-1/2 Circle Punch #120906/$16.95
  • 2-3/8 Scallop Circle Punch #118874/$16.95
  • Heat Tool #129053/$29.95
  • Petite Pocket Bigz XL die #123131/$42.95
You can purchase any of these products by going to my online store.

Hope you enjoyed today's project.  Until next time...

Happy Stamping!

Josie

Friday, October 19, 2012

Bells & Boughs Christmas Poinsetta

Hello All!

Yes, it has been a while again...over a month.  I don't have anything to say for myself.  The last few weeks have been crazy both at work and otherwise.  As for the otherwise, the last few weeks of September were spent getting ready for my groups annual Stampin' for a Cure event which we held on October 6th.  We raised over $6,000.00 again this year for our local Susan G. Koman Foundation.  It was a very successful event, as usual.  We had silent auctions, raffles...you name it and we did it. 

At work, I had about 100 essays that needed grading that took up quite a bit of my stamping time for a few weeks, so needless to say, I didn't get much stamping done.

But I've been busy the last few days with creating some cards for both my own personal use and for an upcoming Christmas card class.  There is no better way to get Christmas cards done is to invite people to a class!  :)

I cased the layout for this card from  Card Maker Magazine , but the products I used are from Stampin' Up!

Here is a list of what I used:

    • Base: Very Vanilla card stock #101650/$8.50
    • First Layer:  Old Olive card stock #100702/$6.95
    • Second Layer: Campaign Glimmer Paper (retired)
    • Delicate Doilies Sizzlits L #126999--$21.95
    • Bells & Boughs stamp set  #120831(w) $19.95 or #121142 (c) $14.95
    • Joyous Celebrations stamp set #128066 (w) $22.95 or #128069 (c) $15.95
    • Blender Pens #109845/$9.95
    • Cherry Cobbler Classic Ink #126966--$5.95
    • Old Olive Classic Ink #126953--$5.95
    • Black Stazon  #101406--$7.95
Hope you like the card.  Let me know what you think.  If you have any questions about it, please feel free to ask.

Until next time...

Happy Stampin'!

Josie

Coming Soon!

I know I've been away for awhile again.  I promise there will be something pretty to see by the end of the day.

Until then...

Happy Stamping!

Josie

Sunday, September 16, 2012

Holy Molly!

Bird Cage Front View
(Twitterpated DSP)
 I can't believe it has been so long since I last posted.  I noticed my last post was right before my husband and I left for a three-week tour of Italy with my mom, sister and brother-in-law.  It was an awesome trip, to say the least...but we definitely need another vacation to recuperate once we got back.  We spent the first two weeks visiting...are you ready...ROME, FLORENCE, VENICE, POMPEII, SICILY, (we were in Sicily about 5 days...we circled the island) SORENTO, POSITANO, CAPRI, POMPEII...I am sure I left one out.  The third week was spent in Rome.  We have a family friend that has lived there for about 40 years.  My sister and I along with our husbands rented an apartment, while our mother stayed with her.  That last week was action packed too.  We learned to get around on the city's buses and metropolitan (an experience in itself).  We also had the opportunity to visit my mom's hometown near L'Aquila.  In the past we would have spent the final week there...a bit less congested and a slower pace, but it was devastated by an earthquake a few years ago.  Hopefully in the future, we will be able to return and once again stay in her home town.  It is a quaint little mid-evil village in the Appenine Mountains in the Abruzzo region of Italy.  I think that when we go back we will just stay there and enjoy the slower paced side of Italian life.

Shortly after returning from Italy, I had the pleasure of "babysitting" our 10-month-old granddaughter for a week while her mommy and daddy when on their honeymoon.  It was fun and I enjoyed every minute of it.   I do know why, though, we have our children when we are in our 20's and 30's...I was exhausted everyday.  Everyday I thought I'd get some stamping in while she was napping, but Nonna (Italian for Grandma) didn't have the energy...I napped too!

When that was done, a few weeks later I returned to work...school started here in Colorado Springs on August 13th.  This is my 16th year of teaching!  Time flies when you are having fun. :)  I've taught 7th and 8th graders since I first began, and this year I will be instilling the desire to read in my 8th graders once again as I teach Language Arts.  I have HUGE classes this year, larger than they have ever been, with 35 and 36 students in a class.  The kids keep me busy and I really do love each one of them.  They will be the one thing I will truly miss when I finally do retire...whenever that may be.  :)  I won't miss the papers I drag home, I won't miss the politics,  I won't miss the testing, and I surely won't miss the drive in on those cold winter mornings...but I will miss my "peeps" as I call them.  They are funny, kind, at times frustrating, but most of all the light of my life as a teacher! 

So all of this brings me to here...four months since my last post with a lot to share with you.  Most of the stuff was done at the beginning of June before our vacation, and I sort of feel funny showing it to you now since most people are working on their Halloween, Thanksgiving, and Christmas stuff. But, hey!  I made this stuff and it's pretty and just because the holidays are around the corner doesn't mean we can't still do other stamping.  I hope you enjoy my stuff, and I hope I am not away for four months again.  :) 

If you have any questions about the cards I've posted below, please feel free to email me and I will be happy to answer them.

Until next time...

Happy Stamping!

Josie

Summer Smooches Happy Birthday

Summer Smooches again! 
Bird Cage Side View

Wednesday, June 13, 2012

Zig Zag Gift Card Holder

Hello all.  It has been a few days since my last post, but I have been very productive these last few weeks.  Thought I'd get one more post in before we leave for our vacation this weekend.  We will be gone for awhile, so I wanted to share something pretty to hold you over till we get back.

I got the inspiration for this card from Paper Crafter's Magazine this past week.  They didn't have dimensions on how to cut this little thing out, so I figured them out myself.  I will share them with you.  What I like about this card is there is a pocket in the back for a book mark and on the inside a spot for a gift card.  How cute is this anyway!  I think this would be a perfect to give my school's Language Arts Student of the Year his/her gift, which is usually a gift card to a book store.  One can't read enough, don't you think?

I used the Twitterpated designer series paper that is in the current Stampin' Up! Annual Catalog.  I fell in love with paper when it first appeared in the Occasion Mini and am sooooo happy they carried it over into the new catty.  The item number is 125406 if you are interested.  On the inside and outside of the card I used a small envelope size 3 1/8 x 3 1/8 inches.  Item number is107309.  The one on the outside is partially covered with dsp and on the inside it is total covered.  Both are adhered with stampin' dimensionals.

The measurements for the card base are 10 1/2 inches by 5 1/2 inches.  I then placed the long edge at the top of my Simply Scored (122334)  and scored the card stock at 3 1/2 inch and again at 7 inches.  I then cut from the top of the first score line at a diagonal to the 1 1/2" mark from the top of the card stock on the right edge of the paper. Fold on the first score line  (make a mountain) over to the left edge of the paper.  You can make the back pocket here by using sticky strip on three sides, leaving the top open.  Then fold the top flap over to the right.  I know this sounds confusing, so I am adding a picture. at the bottom.  Decorate as you choose.  I don't think you can go wrong with Stampin' Up! products as everything coordinates so perfectly. 

Well, that's all for today.  Hope you like what you see here today and I hope the diagram at the bottom is helpful.  Until next time...

Happy Stamping!

Josie


Friday, June 8, 2012

Open Sea

Remember this stamp set?  I am so glad I held on to it. It first appeared on the Stampin' Up! scene last summer.  I don't think it ever did go away.  I love it because it is a very masculine set and sometimes you just need a very masculine card!
Tomorrow is our anniversary so I thought I'd pair this stamp with some of the blue dsp in Summer Smooches paper.  The blues are Island Indigo and Tempting Turquoise.  My husband likes blue. 

I didn't put a sentiment on it because I wanted to write a special message inside. 

Well, this is going to be a quick one.  I have a few more things to get done before he gets home from work.  Soooo....until next time.

Happy Stamping!

Josie

Thursday, June 7, 2012

Happiness Is...

Happiness is...whatever you want it to be.  I believe we have a choice in this life to either choose to be happy with what we have or miserable and constantly complain.  I can't stand being around constant complainers! 

The colors on this card make me happy.  I have always been a lover of bright colors, especially greens, purples, and oranges.  These colors are Tangerine Tango, Lucky Limeade, and Rich Razzelberry, and all three are colors you will find in the new Floral District designer series paper.  I just love, love, love it.  Item number for this paper is 126919. 

The stamp set I used is Bright Blossoms (125497) for the image, and Loving Thoughts (125845) for the sentiment.  And don't forget the butterflies...they are a little touch of happiness too!  I made them with the Beautiful Wings Embosslits die (118138).  You can get any of the items I've mentioned by going to my online store by clicking the button in the top right column.

Hope you like today's creation.  I have more to share in the next few days. 
Until next time...

Happy Stamping!

Josie


Sunday, May 20, 2012

Dare-to-Dream Gift Card Holder

Hello Stampers!

It has been a few weeks, hasn't it?  :)  I have been getting ready to wind down the school year here, so I haven't done much stamping lately.  But I sort of couldn't put it off much longer.  I needed a gift card holder for a Barnes & Nobel gift card I purchased for a student.  Thursday is our end-of-year awards assembly, and I have the honor of awarding Outstanding Language Arts Student to one of my current 8th graders.  What makes it even more special is that I had the privilege of being her teacher when she was in 7th grade as well.  I switched over from 7th to 8th at the beginning of this year.

Although I will miss this student and many others for that matter, I am relieved that the end of the year is upon us.  It has been a long year, even though it seems as if it went by very quickly.  By the time May rolls around, I start feeling the signs of burn-out and really need a few weeks off to regenerate for the next year. 

Anyway, this is the gift card holder I made for my student.  I copied the lay out from a card that a friend of mine created, but I used different stamps and paper.    After I list all of the Stampin' Up! products I used, I will tell you how I made the card base.  You will want to scroll down to the end of this post to see the inside of the holder.

Here's what I used:
  • Creative Elements (122645/wood; 122647/clear)
  • Loving Thoughts (125845)  This is from the Occasions Mini, but I think it will be in the new IBC.
  • Crumb Cake C/S (120953)
  • Baja Breez C/S (111352)
  • First Edition Specialty DSP (121878)
  • Soft Suede Classic Ink (115657)
  • Scallop Trim Border Punch (118402)
  • Itty Bitty Shapes Punch Pack (118309)
  • Bitty Buttons (118761)
  • Vintage Trinkets ((118764)
  • Designer Frames Embossing Folders (123130)
  • Linen Thread (104199)
Click here to go to my Stampin' Up! website and click on the Shop Now button to order any one or all of these items.

Okay, here's how to make the card base with the gift card pocket inside.  Cut two pieces of card stock 5 1/2 by 8 1/2 inches.  Score each at 4 1/4 inches.  This will be your fold line.  After the card stock is cut, place the 8 1/2 inch side of the paper at the top of your paper cutter and cut 2 1/2 inches from one end on each 5 1/2 by 8 1/2 inch piece.  Adhere these shortened end together leaving an opening large enough to hold the gift card.  I used the gift card to guide me as to where I should place sticky strip.  You will place sticky strip along 3 sides, leaving the center top open for the gift card.  Decorate the outside of the holder as you wish.

Below is the inside of the gift card holder.  I covered up the note that I wrote, as I wrote on the inside of the card before I photographed it. 

Hope you like this.  As always, your comments are welcome.  Thank you for stopping by.

Happy Stamping!

Josie


Sunday, April 29, 2012

Paper Bag Albums

I promised I would share this last week and never did get around to doing it.  It was probably best, because the entire project was not yet complete.

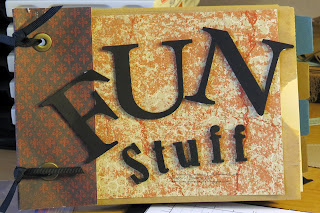
A co-worker at school is retiring at the end of this school year.  We usually present the retiree with some sort of scrapbook or memorabilia that marks his or her time teaching.  This gentleman has been a teacher for 20 years and has decided it is time to move on.  A friend of mine and I were tasked with coming up with an idea for a retirement gift for him.  We figured a typical scrapbook wouldn't do, so I came up with the idea to make up these paper bag albums.  We made a set of three albums, each with a different title; Retirement, Basketball, and Fun Stuff.  The Retirement album contains well wishes from each of his colleagues written on 4 1/2 by 5 1/2 inch Very Vanilla Card Stock.  The Basketball album contains pictures of different basketball teams he coached over the years at our school, and the Fun Stuff album contains just that; photos of him doing various fun stuff during his time as a teacher both with other staff members and students.  Each bag album will be presented to him in a decorated Ukulele case at the district's Retirement Tea on May 1.  We chose a Ukulele case because it is similar to a guitar case.  (He plays guitar and has taught several guitar enrichment classes to our students over the past few years.) The designer series paper that I used to decorate each bag is the soon to be retiring Well Worn paper from Stampin' Up!  (Item number 122359 for $10.95)  I selected this paper because it has a vintage look and the colors are very masculine.

Most of the embellishments were purchased at a local craft store.

Following the photos, I will provide you with directions on how to make one of these paper bag albums.  I hope you like what my friend and I have created.  Until next time...

Happy Stamping!

Josie


 I tried antiquing the Ukulele case by rubbing some sand paper over the surface to rough it up a little.  The musical notes are printed on to vellum card stock using clip art on my computer.  They were hand torn around the edges and glued to Soft Suede card stock.  The words around the sides of the case are the lyrics to the Beatles' song While My Guitar Gently Weeps.  The same song has also been recorded onto one of those recordable cards and the song plays when the case is open.


Here's what you need to make one paper bag album.

  • 6 - 8 brown paper lunch bags
  • snail adhesive #104332--$6.95
  • 1/4 " grosgrain ribbon
  • designer series paper
  • Very Vanilla Card Stock (Cut 6 - 8 pieces depending on number of bags you use 6 3/4" by 5".)
  • #119864 Round Tab Punch (Soon to Retire)  $16.95
Cut the bottom off of the lunch bags.  Do this by placing the long edge of the bag across the top of your paper cutter with the open end of the bag at the 7 1/4" mark.  Adhere the cut bags together with snail adhesive along the cut edge, making sure the bags are all facing the same way. 

Cut a piece of designer series paper 4 1/4" by 5 1/2".  Score it at 2" from either end.  This is used as the binding to cover the cut ends of the paper bags once they are all stuck together.  You can add a border trim to either side of the album under the designer series paper.  Using a crop-a-dile, punch two evenly spaced holes for eyelets.  Add the eyelets.  Thread a 4" piece of grosgrain ribbon through the eyelets and tie a knot. 

Punch 6 to 8 tabs using the round tab punch.  Adhere them to the edge of the Very Vanilla card stock that you have already cut into 6 3/4' by 5" pieces. Make sure to stagger them on the different pieces of card stock.  Slide one of each of these pieces of card stock into each bag.  You can add photos to these if you like. 

On each bag "page" I added a piece of designer series paper cut the same size as the Very Vanilla card stock to cover the paper bag.  You can also add pictures and embellishments to these pages. 

There you have it.  Your Paper Bag Album is complete!  :)

Sunday, April 22, 2012

Retiring Stamp Sets

Hello All,

I am providing the link to the list of retiring stamp sets that was recently published by Stampin' Up!  The last day of May is the final chance to order any of those that are going that are on your wish list. 

http://204.228.150.61/docs/lastchance/en-US/RetiredStamps_0412_en-US.pdf


Just click on the button on the right to go to my online store.  \

I will have something to show you later today and I think you are gonna like it!

Until then...

Josie

Saturday, April 7, 2012

Blank Card

Happy Easter!

It has been a week since I've been back in school after going off spring break and since my last post.  We have only 7 more weeks of school, but...who's counting?  I am! :)  The kids already think they are on summer vacation so it was a hard time keeping them focused this week.  Thinks are only going to get worse.  :(


I wasn't sure what title I should give this post, so I've called it Blank Cards since there is no sentiment on the front.  I've cased this from the Occasions Mini Catalog page 15.  I really like the way it turned out.  Maybe I will use it for this coming Mother's Day.  Now that's a thought.  The colors of card stock that I used are old olive, very vanilla, baja breeze, blushing bride, and sot suede.  The ink is early espresso for the image and soft suede was used for sponging.  The stamp set is one of my favorites from the Occasions Mini; Rue Des Fleurs.  Oh, and the background oval was cut out using a window sheet and the ovals die in the IBC.  I also used the stripes and designer frames embossing folders, also found in the IBC.  The flowers and leaves were punched using the Bird Builder and Itty Bitty Shapes punch pack.  And pearls....lots of pearls!  I think this card is so pretty and vintage-y looking.  I hope you like it.


This is a short post again today.  I still need to do a few things to get ready for Easter dinner tomorrow.  Hope everyone has a very Happy Easter!


Until next time...


Happy Stamping!


Josie

 P. S. I forgot to mention, the banner is from Take it to Heart stamp set, also in the Occasions Mini.  I simply shortened it by cutting it in half and overlapping the two cut ends and using snail adhesive to hold it together.


Sunday, April 1, 2012

One More Post

Just one more post before I head off back to work tomorrow to finish up the school year.  Spring break has been fabulous and productive.  The weather was awesome; unseasonably warm.  Today the temperature hovered around 80 degrees.  It is hard to believe the high tomorrow is only going to be in the upper 40's.  That means I have to go back to wearing winter cloths.  Blah!!

I made this card for a special person who is going through a tough time right now.  She is getting divorced and that is never a fun thing, no matter how long or short you have been married.  This person is very special to me...it is my daughter.  :(  Her husband of 2 1/2 years informed her shortly after Christmas that he no longer wanted to continue with their marriage.  This came as a shock and disappointment to all of us as I thought the world of my son-in-law.  What can I say?  He is not the person I initially thought he was.  Anyway, she doesn't know it is for her, but she will when she gets home this evening.  She is a strong woman (just like her mom :) and she will thrive when all is said and done.  As a matter of fact, she already is!

I used the Send Me Soaring stamp set along with some Sweet Shoppe designer series paper.  Both can be found in the current Occasions Mini Catalog.  I love the bright colors which are pool party, lucky limeade, and calypso coral. I hope you enjoy looking at it as much as I enjoyed making it.

Until next time...

Happy Stamping!

Josie

Friday, March 30, 2012

Sweet Shoppe Birthday

 My baby boy turned 25 today!  Where has the time gone?  As we sit here waiting for my husband to get home from work so we can go out and celebrate Chris's birthday, I thought I'd post the card I made for him.  It's simple, but cute.  I used the Sweet Shoppe designer series paper in the Occasions Mini on page 33 along with Create a Cupcake stamp set that is in the big Idea Book and Catalog. 

If you are wondering where to score a piece of 4 1/4 x 11 card stock to make a card that opens in the middle like this, you would score it at 2 3/4" from both ends. 

As I mentioned, this was going to be a quick post.  Hope you like the card.  Until next time...

Happy Stamping~

Josie

Thursday, March 29, 2012

Happy Easter Everybunny!

I finally had the opportunity to sit down and stamp yesterday.  The week has been pretty busy.  I saw the movie Hunger Games on Monday with a group of friends from work and I thought it was awesome.  Now, I've spoken to a few people that didn't like it, but they also said they didn't read the book so I am wondering if that is what made the difference for me?  The movie, as usual, leaves a few things out, otherwise the movie is very true to the book.  I loved it and I can't wait for the next one to come out next November of 2013. 

I also spent part of the week catching up on some long overdue housekeeping.  I cleaned out and re-organized a storage closet in the basement and took a load of "stuff" to Goodwill on Tuesday. And yesterday morning I worked on cleaning up the garage and my car which were both in sore need of some attention.  There is still plenty that needs to be taken care of, but I decided it was time for me to have some fun in my stamp room.


The first card I am sharing was made using the Everybunny stamp set currently found in Stampin' Up!'s Idea Book and Catalog.  I paired it with some Lucky Limeade  and Wisteria Wonder card stock and Sweet Shop designer series paper that is in the Occasions Mini.


This second Easter card was super easy to make.  I used one of the Baja Breeze Every Day Elegance Simply Sent cards that is available through Sale-a-bration. (Sale-a-bration expires on Saturday, so if there is anything you've been wanting, now is the time to place your order!)  I made the flower using  flowers from the Blossom Builders Designer Printed Kit. You can't get any easier than that.  The sentiment comes from the Everybunny set that I used in the first card.

So there...you got two cards for the price of one today.  I love it when I have time to spend in my stamp room!  Hope you enjoyed your visit and thank you for stopping by.  As always...

Happy Stamping!

Josie


Monday, March 26, 2012

Happy Spring!

I can't believe spring break is here for me, and I a already have way through my things to do list.  I purposely front-loaded this week so I can spend the rest of the week relaxing and stamping!  I am looking forward to it.  This afternoon I am taking some time to meet a group of friends to see The Hunger Games movie.  I read all three of the books in the series about a year ago and have been anticipating the movie ever since I first learned one was being made. 

Well, enough rambling...now on to the card I want to share with you today.  For this card I used the Tea Shoppe and Loving Thoughts stamp sets found in the current Occasions Mini Catalog.  The Tea Shoppe set is absolutely beautiful.  The dsp is from the Twitterpated series along with basic gray for the base, blushing bride for the punched border, and whisper white for the doily.  The tea cup is stamped in baja breeze on whisper white.  I added a little of dazzling diamonds glitter to the tea cup.  I just love the way this turned out!   If I remember correctly, I saw one similar to this on SplitCoast, but I can't remember  who exactly it is partially cased from.  Sorry about that. 

It's time for me to get ready for the movie, so until next time...

Happy Stamping~

Josie

Sunday, March 11, 2012

Birthday

I know it has been way too long since I last posted and I really do apologize.  I didnt' realize so much time had passed.  It has been almost 2 months!  Where does time go?

The basic design of this card was created by a friend of mine.  I just made a few minor changes; mainly I turned it into a birthday card.  It is one that we will be making at an upcoming All-Occasions Card class I will be holding.  I used the Sweet Shop designer series paper in the current Occasions Mini Catalog.  I just love this shade of purple.  I would have never thought to put purple and green together.  I also used the Create a Cup Cake stamp set and punch in the big Idea Book and Catalog along with the coordinating punch. The colors of paper an ink I used are Pool Party, Wisteria Wonder, Lucky Limeade, and Whisper White.

Hope you like it!  I'll try not to be so long next time.  Until then...

Happy Stamping!

Josie


Friday, January 20, 2012

Simply Sent Valentine

Whew!  The end of another busy work week.  Even though I had Monday off, it seems like this week was 6 days long instead of 4.  Shortened weeks get the kids out of sorts and sometimes they can be worse than a 5 day week.  All I can say is TGIF!  Unfortunately, the weekend is only 2 days. :(

The month of January is almost over and I thought I'd get a jump on my Valentine Cards.  This is a simple one, and one I think I will do at this month's club.  It is easy to prep for.  I used the second of the two designs that come in the Designer Cuts Cards and Envelopes Set (125414) in the Occasions Mini.  I love these cards.  All of the work is practically done for you.  I added a rosette that I made using a 1/2" x 12" strip of News Print Specialty dsp (121878).  If you aren't sure how to make these flowers, the March issue of Card Maker Magazine has an excellent tutorial.  I scored my strip of dsp every 1/4 inch and adhered it to the Blushing Bride punched out circle using a glue gun.  I also adhered a piece of Blushing Bride card stock to the inside of the card so that you could see it through the pre-cut heart.  I bannered two 1/2" wide strips of the News Print Specialty dsp and adhered them to the underside of the rosette using a glue dot.  The entire thing is attached to the card using a dimensional.  The sentiment comes from P.S. I Love You stamp set also in the Occasions Mini (125460/wood or 125462/clear).

Hope you like it!  Until next time...

Happy Stamping!

Josie

Sunday, January 15, 2012

Take It to Heart Friendship Card


I just can't get enough of working with my new stuff from Occasions Mini.!  As I've said previously, I love all of it.  I made this card last night and wanted to keep on making things, but it got to be pretty late and my body kept telling me to go to bed.  I don't think a person can go wrong with any of the things in this Mini catalog.  They are all so beautiful, and everything coordinates so well.  I don't have much time today, so I will get to the card.  After that, I am going back to my stamp room to play some more.  If only I didn't have to stop to make dinner!  :)

On this card I used the Take It to Heart stamp set (125520/wood or 125522/clear) that is in the Mini.  I don't consider myself as very good at water coloring, but I think this one turned out pretty well.  The sentiment comes from Language of Friendship (122752/clear) that is in the current IBC.  I also wasn't sure about the bird, but there is something about this one that said I absolutely had to have it.  I'm glad I listened to that little voice when I placed my order.  Other things I used from the mini are Twitterpated DSP (125406), the Paper Doily Sizzlits Die ( 125592), and the Baja Breeze 3/8" Pleated Satin Ribbon (125571). When I saw this ribbon I knew that I had to have all of it, so I got all four colors.  The card base is Island Indigo and the border around the dsp is Baja Breeze.  


Until next time...

Happy Stamping!

Josie

Friday, January 13, 2012

Happiest Birthday

I finally placed and received all of my Occasions Mini order and boy have I been having fun!  I received the order on Monday, and I wasn't able to get into my stamp room to play until last night.  Now if you don't think Tuesday and Wednesday were painful while all of my delicious new stuff just sat there...you have another "think" coming!  :)

I love everything in this catalog and didn't know what to start with, so I chose the Apothecary Art (125525/wood or 125527/clear) stamp set to get things rolling.  The conclusion I came to was it is a  B-E-A-U-T-I-F-U-L  set!!!!  I sure am glad I got it.

To create this card, I started with one card from the Designer Cuts Card and Envelope Set (125414) for the card base.  For only $9.95 you get 8 cards and envelopes; 4 cards of 2 designs.  The scallop is already punched so you don't have to mess with that!  I then cut 2 pieces of 2 1/2" x 5 1/2" dsp and adhered 1 piece to the inside back of the scallops of the card with snail adhesive  and one to the outside top of the card base.   Oooops!  I missed a step.  I sponged around the edges of the card base and dsp with Soft Suede Ink before I adhered the dsp to the card base.

Next, I wrapped a piece of Pool Party 1/2" seam binding around the front of the card and tied a bow off to the right.  Then, I stamped the largest image from the stamp set on a 5  1/2" x 4 1/4" piece of Very Vanilla card stock in Soft Suede ink.  I cut out the image using one of the Framelits Dies from the Labels Collection (125598) which coordinates absolutely perfectly with this stamp set.  I used my Watercolor Wonder Crayons to color in the image and sponged around the edges with Soft Suede ink.  Finally, I stamped the Happiest Birthday sentiment from the stamp set on a 1/2" piece of Very Vanilla card stock and bannered the edges with my paper snips.  I attached the banner with a dimensional and added a Large Pearl Basic Jewels (125577) and then attached the entire stamped image to the card with dimensionals as well.  I was done!  In no time at all, I had this beautiful birthday card

If you need any more information on what I used to make this card, I would love to hear from you.  I also enjoy reading your comments on my creations so please feel free to leave one if you like.

Until next time...

Happy Stamping!

Josie

Sunday, January 8, 2012

Playing Catch-Up

It has been so long since I last posted and and I am truly sorry for that.  My family and I spent the week between Christmas and New Year in Ohio with family, and shortly after we got back I had to return to work.  So I am way behind on my stamping and posting.  That isn't my only excuse though!  :)  Work keeps me pretty busy too.  I am teaching a new grade this year, 8th Language Arts. And, although the basic concepts are pretty much the same as 7th, I am still learning a new curriculum and creating new lesson plans for things.  I was fortunate in that I got all of my work done early this weekend, and got the chance to play in my stamp room today.

This is a calendar for 2012 that I created with the help of Andrea Walford's Paper Crafters Library.  The basic pattern and calendar was designed by her.  I just added my own touch.  This one is for me!  How many times do we stamp a beautiful thing and we give it to someone else?  I decided this would be mine...ALL MINE!   :)  I made a similar one for a friend of mine as an early birthday gift.  Her birthday is the day after mine next month, but I thought she should have it early before the month of January is over.

I used 12 x 12 Crumb Cake card stock for the calendar base, along with Naturals Patterend DSP and First Edition Specialty DSP.  The First Edition Specialty DSP was also used to make the flower along with one scallop circle cut out of Cherry Cobbler card stock.  An Antique Brad is in the center of the flower.  The button is from the Regals buttons in Cherry Cobbler.  Other things I used were Linen Thread and Victoria 5/8 inch Crochet Trim and 1/2 inch seam binding in Crumb Cake. The black lace and eyelet are both retired.  The cut out chipboard shapes are from On Board Merry Medley.  Finally, the numbers were cut out using my Big Shot and the medium sizzlits dies called Timeless Junior Alphabet.  All of these items can be found in the current IBC or you can find them in my online store. 

Well, I need to iron my clothes for work tomorrow.  I know, who irons?  I usually don't but I forgot to get the pants and shirt I want to wear out of the dryer before the got too wrinkled. :(

Until next time...

Happy Stamping!

Josie

Wednesday, January 4, 2012

Occasions Mini Catalog & Happy New Year

The Occasions Mini Catalog for this year went online today and I and Stampin' Up! are ready for your orders.  :)   That's how I plan on spending my Christmas money this year!

One suggestion I have is to click on the link on the right to view the catalog, make your wish list, and then wait until January 24 when the Sale-a-Bration catalog goes into effect.  You will then be able to get one FREE item from the Sale-a-Bration catalog for every $50.00 in other products you purchase.

Happy Shopping and Happy New Year

Josie